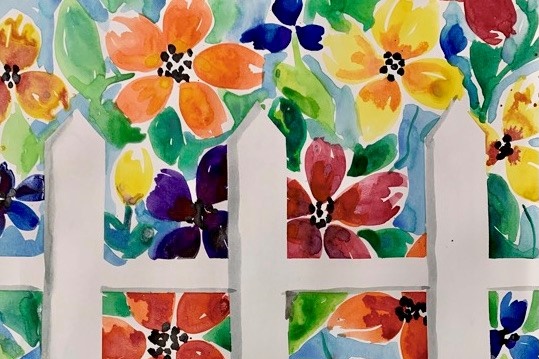
Spring Showers Bring May Flowers! – A Simple Watercolor Lesson
Try this simple watercolor lesson to brighten your day! You will need watercolor paint, 9” x 12” watercolor paper, 4” x 10” contact/shelf liner, scissors, a pen or marker, an old used gift card, and a watercolor brush.
- Self-Adhesive Contact/Shelf Liner– Using the grid on the back, cut TWO long strips that are ½” wide (Fence RAILS) and THREE long strips that are 1” wide (Fence POSTS). Cut off the TOP CORNERS of the fence POSTS to make them pointy.
- Reserving the WHITE of the fence posts– Orient your w.c. paper like a “hamburger.” Starting at the BOTTOM of the paper, peel and stick the first fence POST to the CENTER of the paper. Peel and stick another to the left and another to the right, leaving space between. Peel and stick fence rails horizontally across the posts and trim off the ends. (See example for placement).
- Begin painting flowers all around fence posts ABOVE the BOTTOM RAIL. Paint each petal beginning in the center with two curved strokes that connect at the end (think of a letter ‘C’ and a backwards ‘C’). Try to leave a little white space between each petal as well as the center. *DO NOT add flower centers yet!! Let the paint have time to dry!
- Create 3 large puddles of green, yellow-green and blue-green paint on the palette. Paint leaves and stems in between the flowers and the fence and a grassy area below the bottom rail. Fight the WHITE!
- Add BLACK DOTS to the centers of all your flowers.
- Fill in all the remaining white space with blue, especially the areas around the fence posts, to make it look like sky peeking through the flowers and rails.
- In the puddles of green you mixed on your palette, use an old gift card to add grass texture by stamping the short end of the card in paint first and then onto the grassy area. Allow some of the grass to peek over the edge of the bottom rail.
- Carefully pull off and remove the contact paper fence and throw it away.
- Mix a very watery blackish blue-violet to make a light shadow color. Paint a shadow down the LEFT side of each fence post from the point at top to the bottom of paper. Paint a shadow on the BOTTOM of the fence RAILS. ***ATTENTION!!!! be sure to “HOP OVER” the fence posts to make posts look like they are “overlapping” the rails.
- Add a few stray grass blades overlapping the bottom of the fence. Lay it flat and let it dry. Take a picture and send it to info@handscreate.com and we will post it on our Instagram page #handscreateart!
Hands Create offers uniquely crafted, engaging fine arts classes for emerging to experienced artists. Sign up today for one of our classes!


Share This Story!
Related Posts
[fusion_widget_area name=”avada-blog-sidebar” title_size=”18px” title_color=”var(–awb-color7)” hue=”” saturation=”” lightness=”” alpha=”” background_color=”var(–awb-custom_color_3)” padding_top=”” padding_right=”20px” padding_bottom=”10px” padding_left=”20px” hide_on_mobile=”small-visibility,medium-visibility,large-visibility” class=”” id=”” /]
STAY UP TO DATE
Add your email address below to receive updates about our classes & schedule.

